Click here for a printable PDF version of these instructions

What are Telehealth Video Visits?

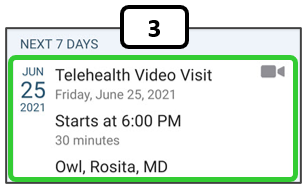
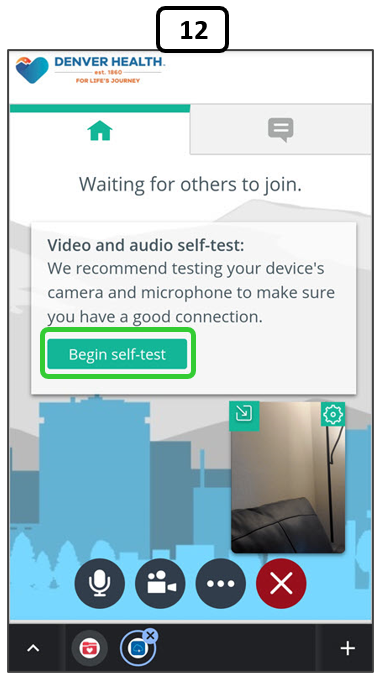
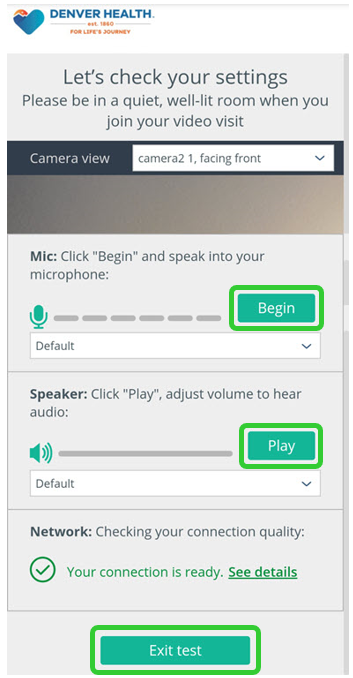
Telehealth visits are face-to-face appointments with your healthcare provide through video over your smartphone or other mobile device. During a telehealth visit, your provider can evaluate your condition and manage your treatment plan without you needing to travel to the provider’s office.

How Do I Enable Telehealth Video Visits?

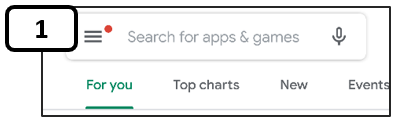
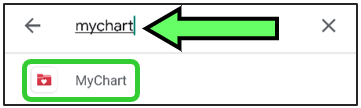
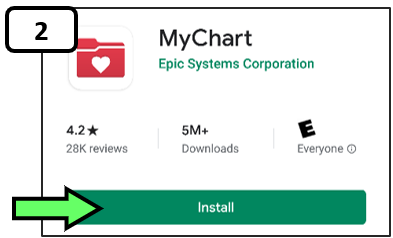
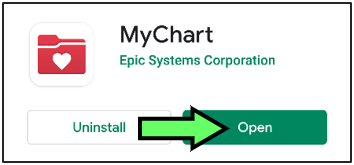
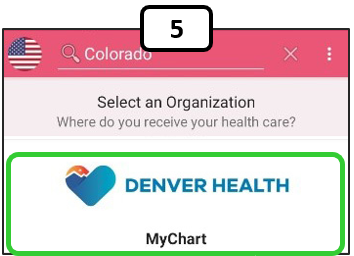
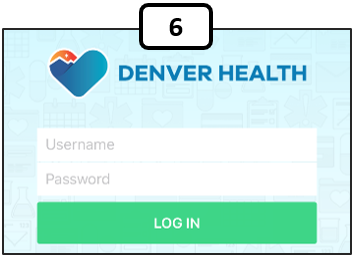
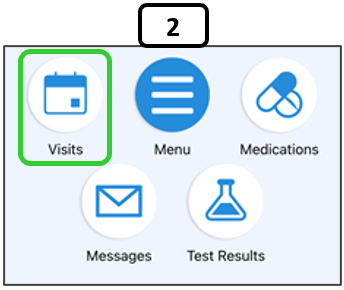
To prepare for a telehealth video visit, you must install and set up the MyChart application on your Android phone. MyChart is Denver Health’s patient portal that gives you direct access to your health information. You can also use MyChart to start video visits in your phone’s Chrome web browser.


To install and set up the MyChart app:

  1. Go to the Google Play Store and search for "mychart".

  1. Install the MyChart app from Epic Systems Corporation and open the app after it has installed.

  1. Click Accept for the agreement that appears.

  1. Allow the app to use your phone’s location or choose Colorado from the list of states that appears.

  1. Choose Denver Health from the list of Organizations.

  1. Sign into your account with your MyChart username and password.

To prepare for and join your Telehealth video appointment:

  1. Launch the MyChart app and log in.

  1. Choose Visits in the main menu.

  1. Choose the Telehealth Video Visit that you want to confirm inyour appointments list.

  1. Select eCheck-In. Note: this option might not be able until a date that is closer to your visit, depending on the type of appointment.

  1. On the eCheck-In screen, if you need to edit or update any of your personal information that appears, choose Edit. Enter your changes and select This information is correct. Then select Next.

  1. You may also be asked to verify your insurance, any payments due for the visit, your current medications, allergies, and your health record, as well as complete a questionaire. After reviewing each of these sections, choose Submit on the final screen.

  1. When you see the “Thanks for using eCheck-In!” message, you can close the eCheck-In screen by selecting the X at the top of the window.

  1. Select Confirm Appointment.

  1. When it’s time for your appointment, press the green Begin visit button at the bottom of the appointment page. You can join the visit up to 30 minutes before it begins. If the button is grey, you'll have to wait until your visit is ready to join.

  1. After you begin the visit, choose QUICK LAUNCH from the options that appear. This should open the Chrome browser and start your video visit.

    Note: you can also choose “Join visit from mobile app” which will use the ExtendedCare Cloud app. However, you will need to have that app downloaded and installed on your phone. The QUICK LAUNCH option using the Chrome browser is the recommended choice.

  1. The Chrome browser should open on your phone, and you will see the video visit page. You might see pop-up messages, like those pictured here, asking for the site and the browser to have access your camera and microphone. Choose to allow access on each of these messages.

  1. It’s recommended that you test your phone’s camera, microphone and network connection before each visit. Choose the green Begin self-test button.

    You can then check the following:

    • Camera view – change your camera choice from the drop-down menu if needed.
    • Mic – choose Begin to start the microphone test. You can also change what microphone to use in the drop-down list (for instance, if you are using a headset or a Bluetooth microphone)
    • Speaker – choose Play to test your phone speaker. If you are using a headset or headphones, you can choose those from the drop-down list if needed.
    • Network – if your network connection is poor or slow, you will want to choose a better connection if one is available.

    When you are finished with the self-test, select Exit test to return to the main visit screen and wait for your provider to join the visit.

Updated 6/29/21